8-channel RF power amplifier assembly and testing
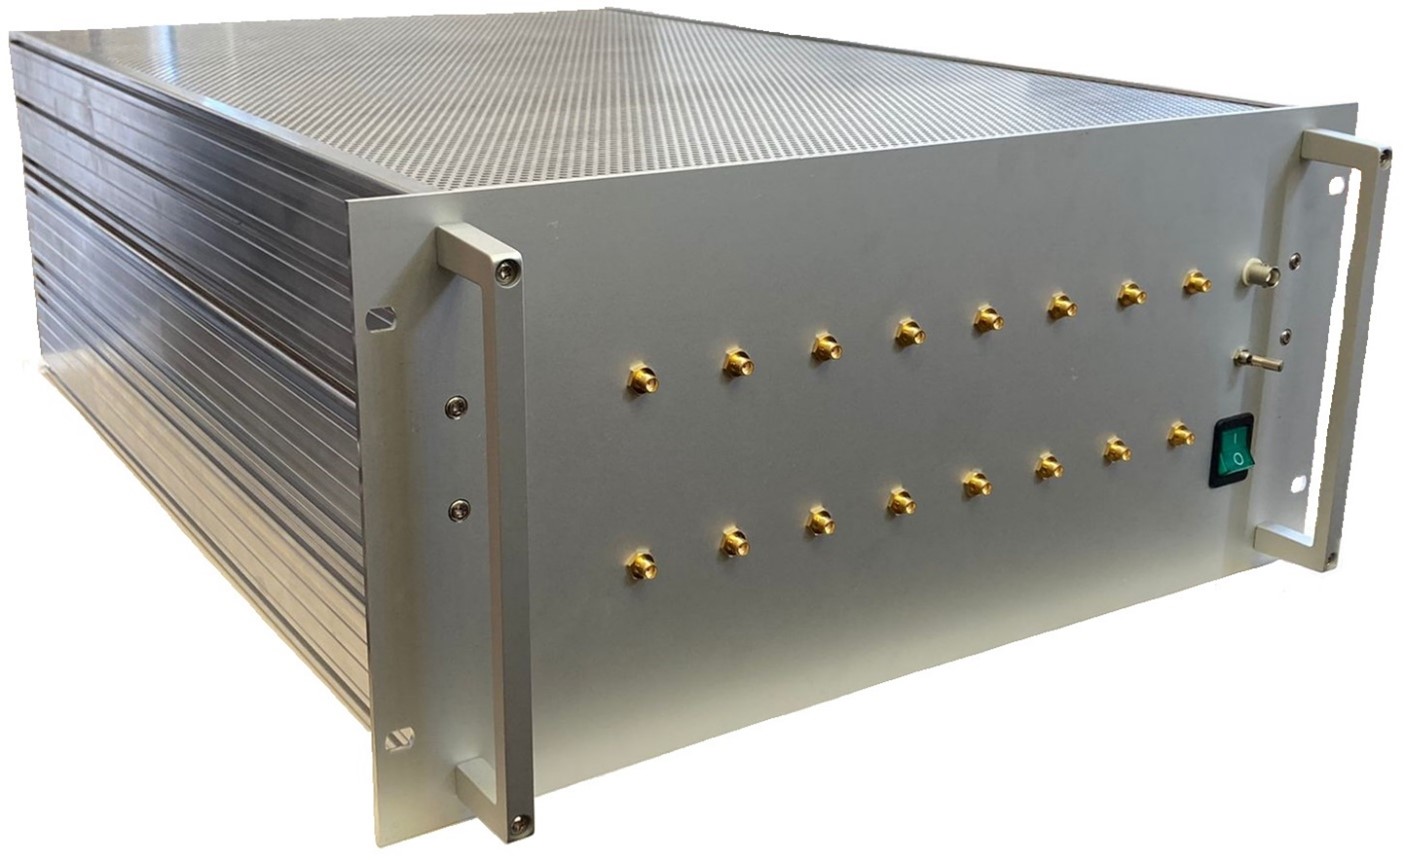
Figure 1 - Photograph of an assembled 8-channel RFPA
General description
The parallel transmission (pTx) RF amplifier is used to separately control the amplitude and phase of eight transmission channels for pTx experiments.
System design
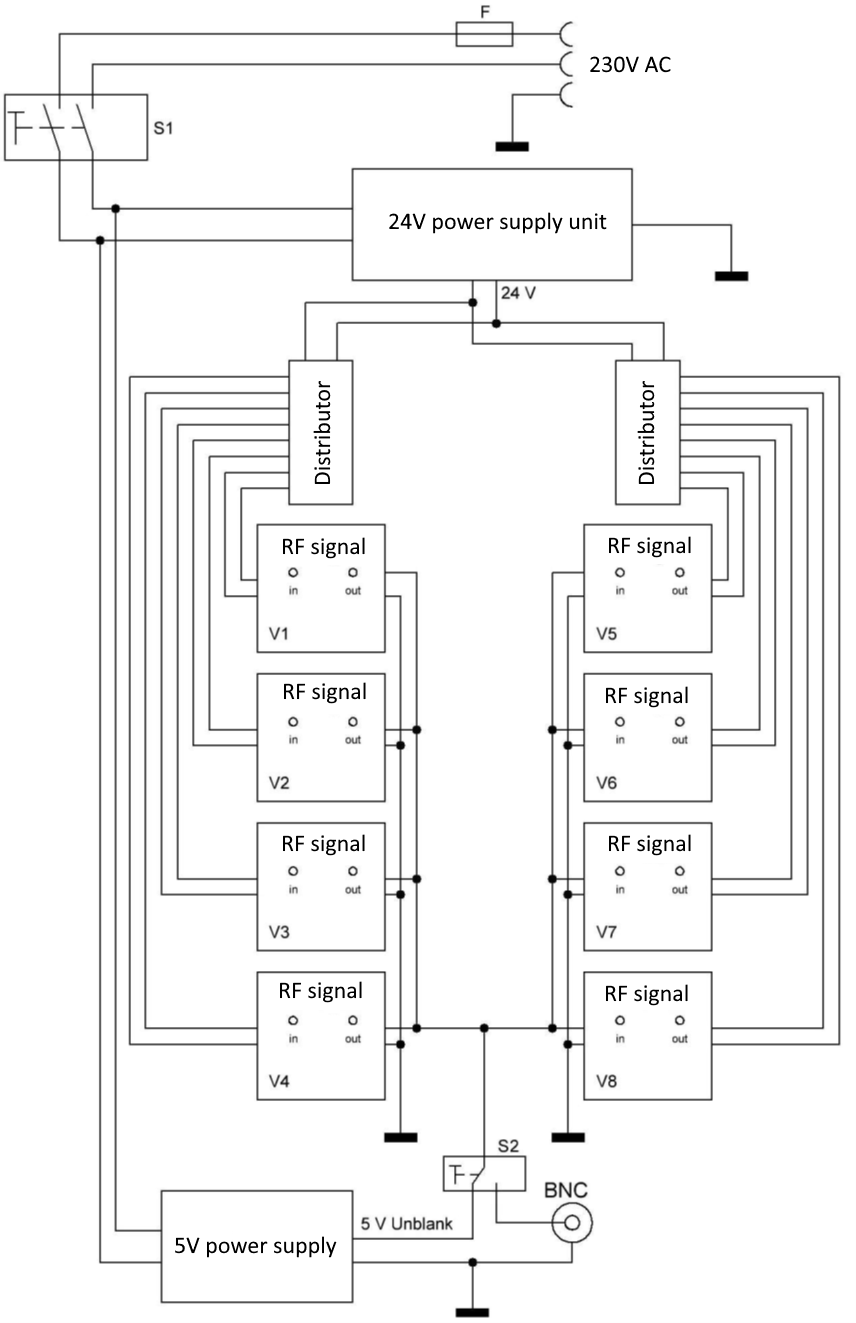
As a main component the broadband high power amplifier ZHL-20W-13SW+ (SN: RB81028153) was used to amplify the signals of the eight channels. The maximum input power for each channel is - 3 dBm (see also the data sheet ZHL-20W-13SW+). A wiring diagram of the PTX amplifier is displayed in Figure 2.
Figure 2 - Wiring diagram of the 8-channel amplifier. The components used can be found in Table 1.
| Item No. | Component | Function | Part name | Est. cost per Pc. [€] | Amount | Total cost [€] |
|---|---|---|---|---|---|---|
| 1 | SMA connector | RF input | Huber & Suhner, 34SMA-50-0-1/111NE | 16 | 8 | 128 |
| 2 | BNC connector | Input external 5V TTL signal | Telegärtner,100023404 | 6 | 1 | 6 |
| 3 | Toggle switch | TTL or manual blanking | Marquardt, 9047.0202 Kippschalter | 23 | 1 | 23 |
| 4 | On/off-switch | 230 V power switch | S Socken, RK-1-01 | 15 | 1 | 15 |
| 5 | SMA connector | Output RF signal | Huber & Suhner, 34SMA-50-0-1/111NE | 16 | 8 | 128 |
| 6 | Fuse | 10 A / electrical protection | Eaton, GBB 10 A | 12.9 | 1 | 12.9 |
| 7 | C14 connector | Main power supply connector | Bulgin, PF0030/28 | 6 | 1 | 6 |
| 8 | 24V Power supply | RSP-1000-24 | Mean Well, RSP-100-24 | 40 | 1 | 40 |
| 9 | 5V Power supply | Auxiliary voltage for blanking | Egston, N1hFSW3 | 31 | 1 | 31 |
| 10-17 | RFPA module | 20W power amplifier module | Mini-Circuits, ZHL-20W-13SWX+ | 1485 | 8 | 11880 |
| 18 | Coaxial cable | 500 mm connector | Farnell, Konfektioniert RG316 | 26 | 16 | 416 |
| 19 | Housing | Schroff, 6 He Fa. May | 300 | 1 | 300 |
Table 1 - Components used in RFPA build.
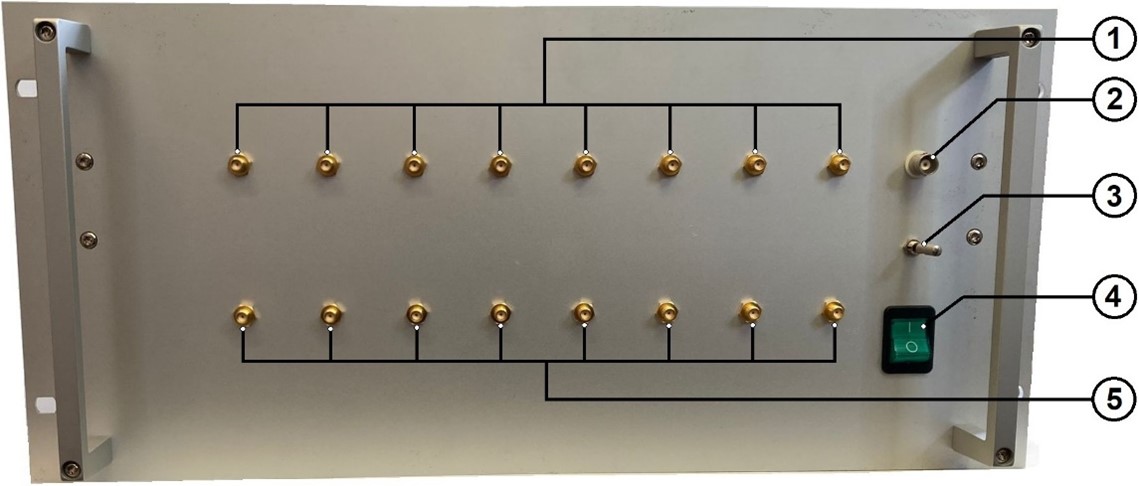
Figure 3 - Front view of RFPA with annotated components (see Table 1)
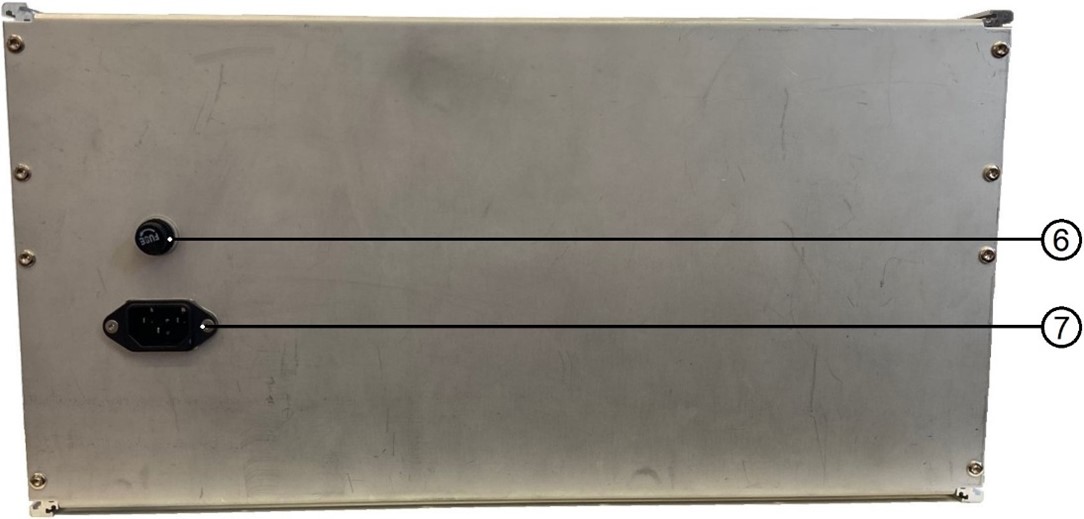
Figure 4 - Rear view of RFPA with annotated components (see Table 1)
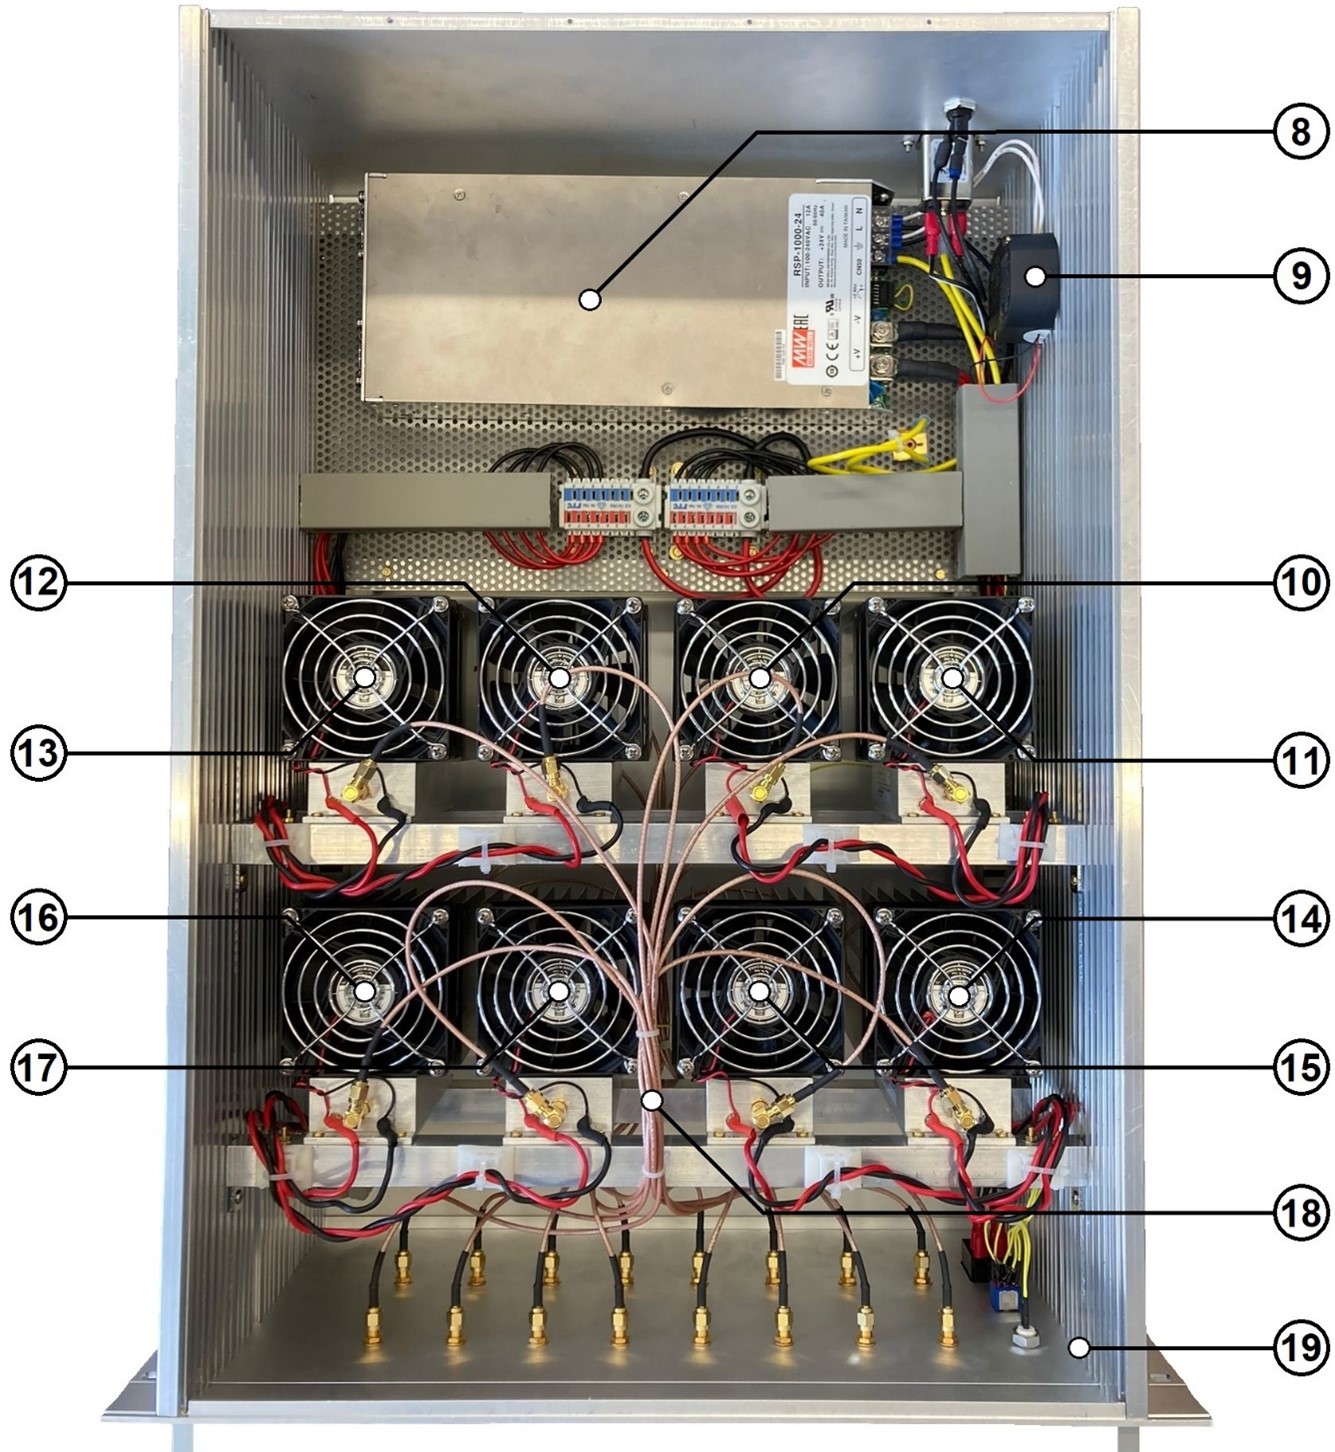
Figure 5 - Top view of the RFPA with the cover removed and annotated components (see Table 1)
Functionality
Before switching on the PTX amplifier, the unit must be connected to the mains voltage (230 V / 50 Hz) at the C14 socket ⑦ and an input or output signal must be connected to the eight channels ① and ⑤Then the PTX amplifier can be switched on with the rocker switch ④. The rocker switch ③ can be used to select between internal manual unblanking (rocker switch right, ON) and blanking by an external TTL signal (rocker switch left, TTL). A 5 V TTL signal can be connected to the BNC socket ②. Unblanking is necessary to unlock the amplifier modules.
Functional tests
Test of the supply current
By measuring the supply current ISC, the general function of the individual amplifiers (High Power Amplifier ZHL-20W-13SW+) is to be tested. For this purpose, a multimeter (VOLTCRAFT MT-51, SN: 09126841) was inserted into the current path of the supply current ISC. According to the amplifier's data sheet, the supply current ISC is max. 2.8 A during proper operation (with fan). The values measured (Table 2) are within the tolerances.
| Channel No. | Vout for Pin=-20 dBm f=123 MHz | Vout for Pin=-10 dBm f=123 MHz | Vout for Pin=-20 dBm f=297 MHz | Vout for Pin=-10 dBm f=297 MHz |
|---|---|---|---|---|
| 1 | 682 mVpp | 2.000 Vpp | 550 mVpp | 1.710 Vpp |
| 2 | 680 mVpp | 2.010 Vpp | 554 mVpp | 1.700 Vpp |
| 3 | 680 mVpp | 2.010 Vpp | 554 mVpp | 1.700 Vpp |
| 4 | 694 mVpp | 2.040 Vpp | 566 mVpp | 1.740 Vpp |
| 5 | 690 mVpp | 2.020 Vpp | 556 mVpp | 1.730 Vpp |
| 6 | 718 mVpp | 2.110 Vpp | 590 mVpp | 1.840 Vpp |
| 7 | 676 mVpp | 2.000 Vpp | 546 mVpp | 1.690 Vpp |
| 8 | 696 mVpp | 2.060 Vpp | 578 mVpp | 1.790 Vpp |
Testing of electrical safety
The electrical safety test was carried out in accordance with DIN 0701 0702.
Power measurement
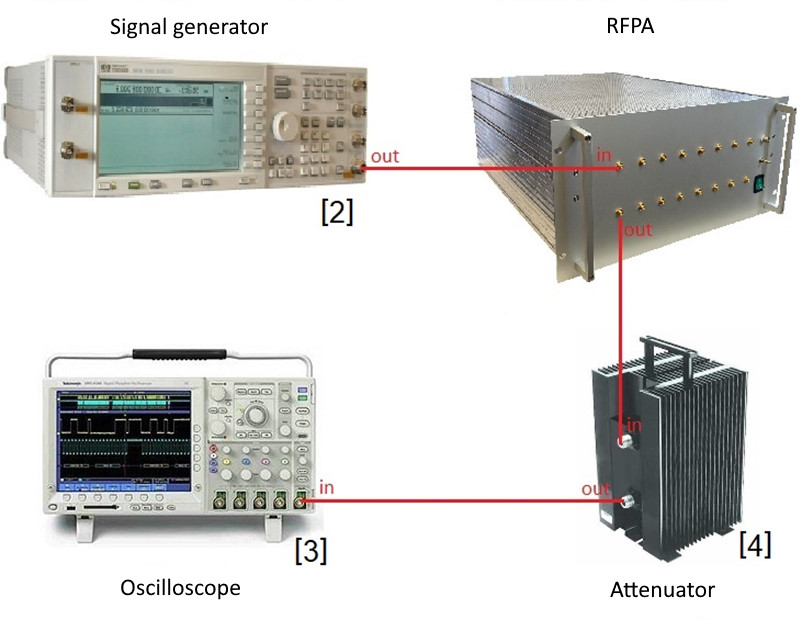
The power measurement is intended to test the general function of the PTX amplifier. For the test setup, an attenuator, an oscilloscope and a signal generator were used as displayed in Figure 6. The attenuator has an attenuation factor of -30 dB. The measured results are displayed in Table 3.
Figure 6 - Power Measurement setup is shown.
